Queen Anthurium Care (Anthurium warocqueanum)

About Queen Anthurium

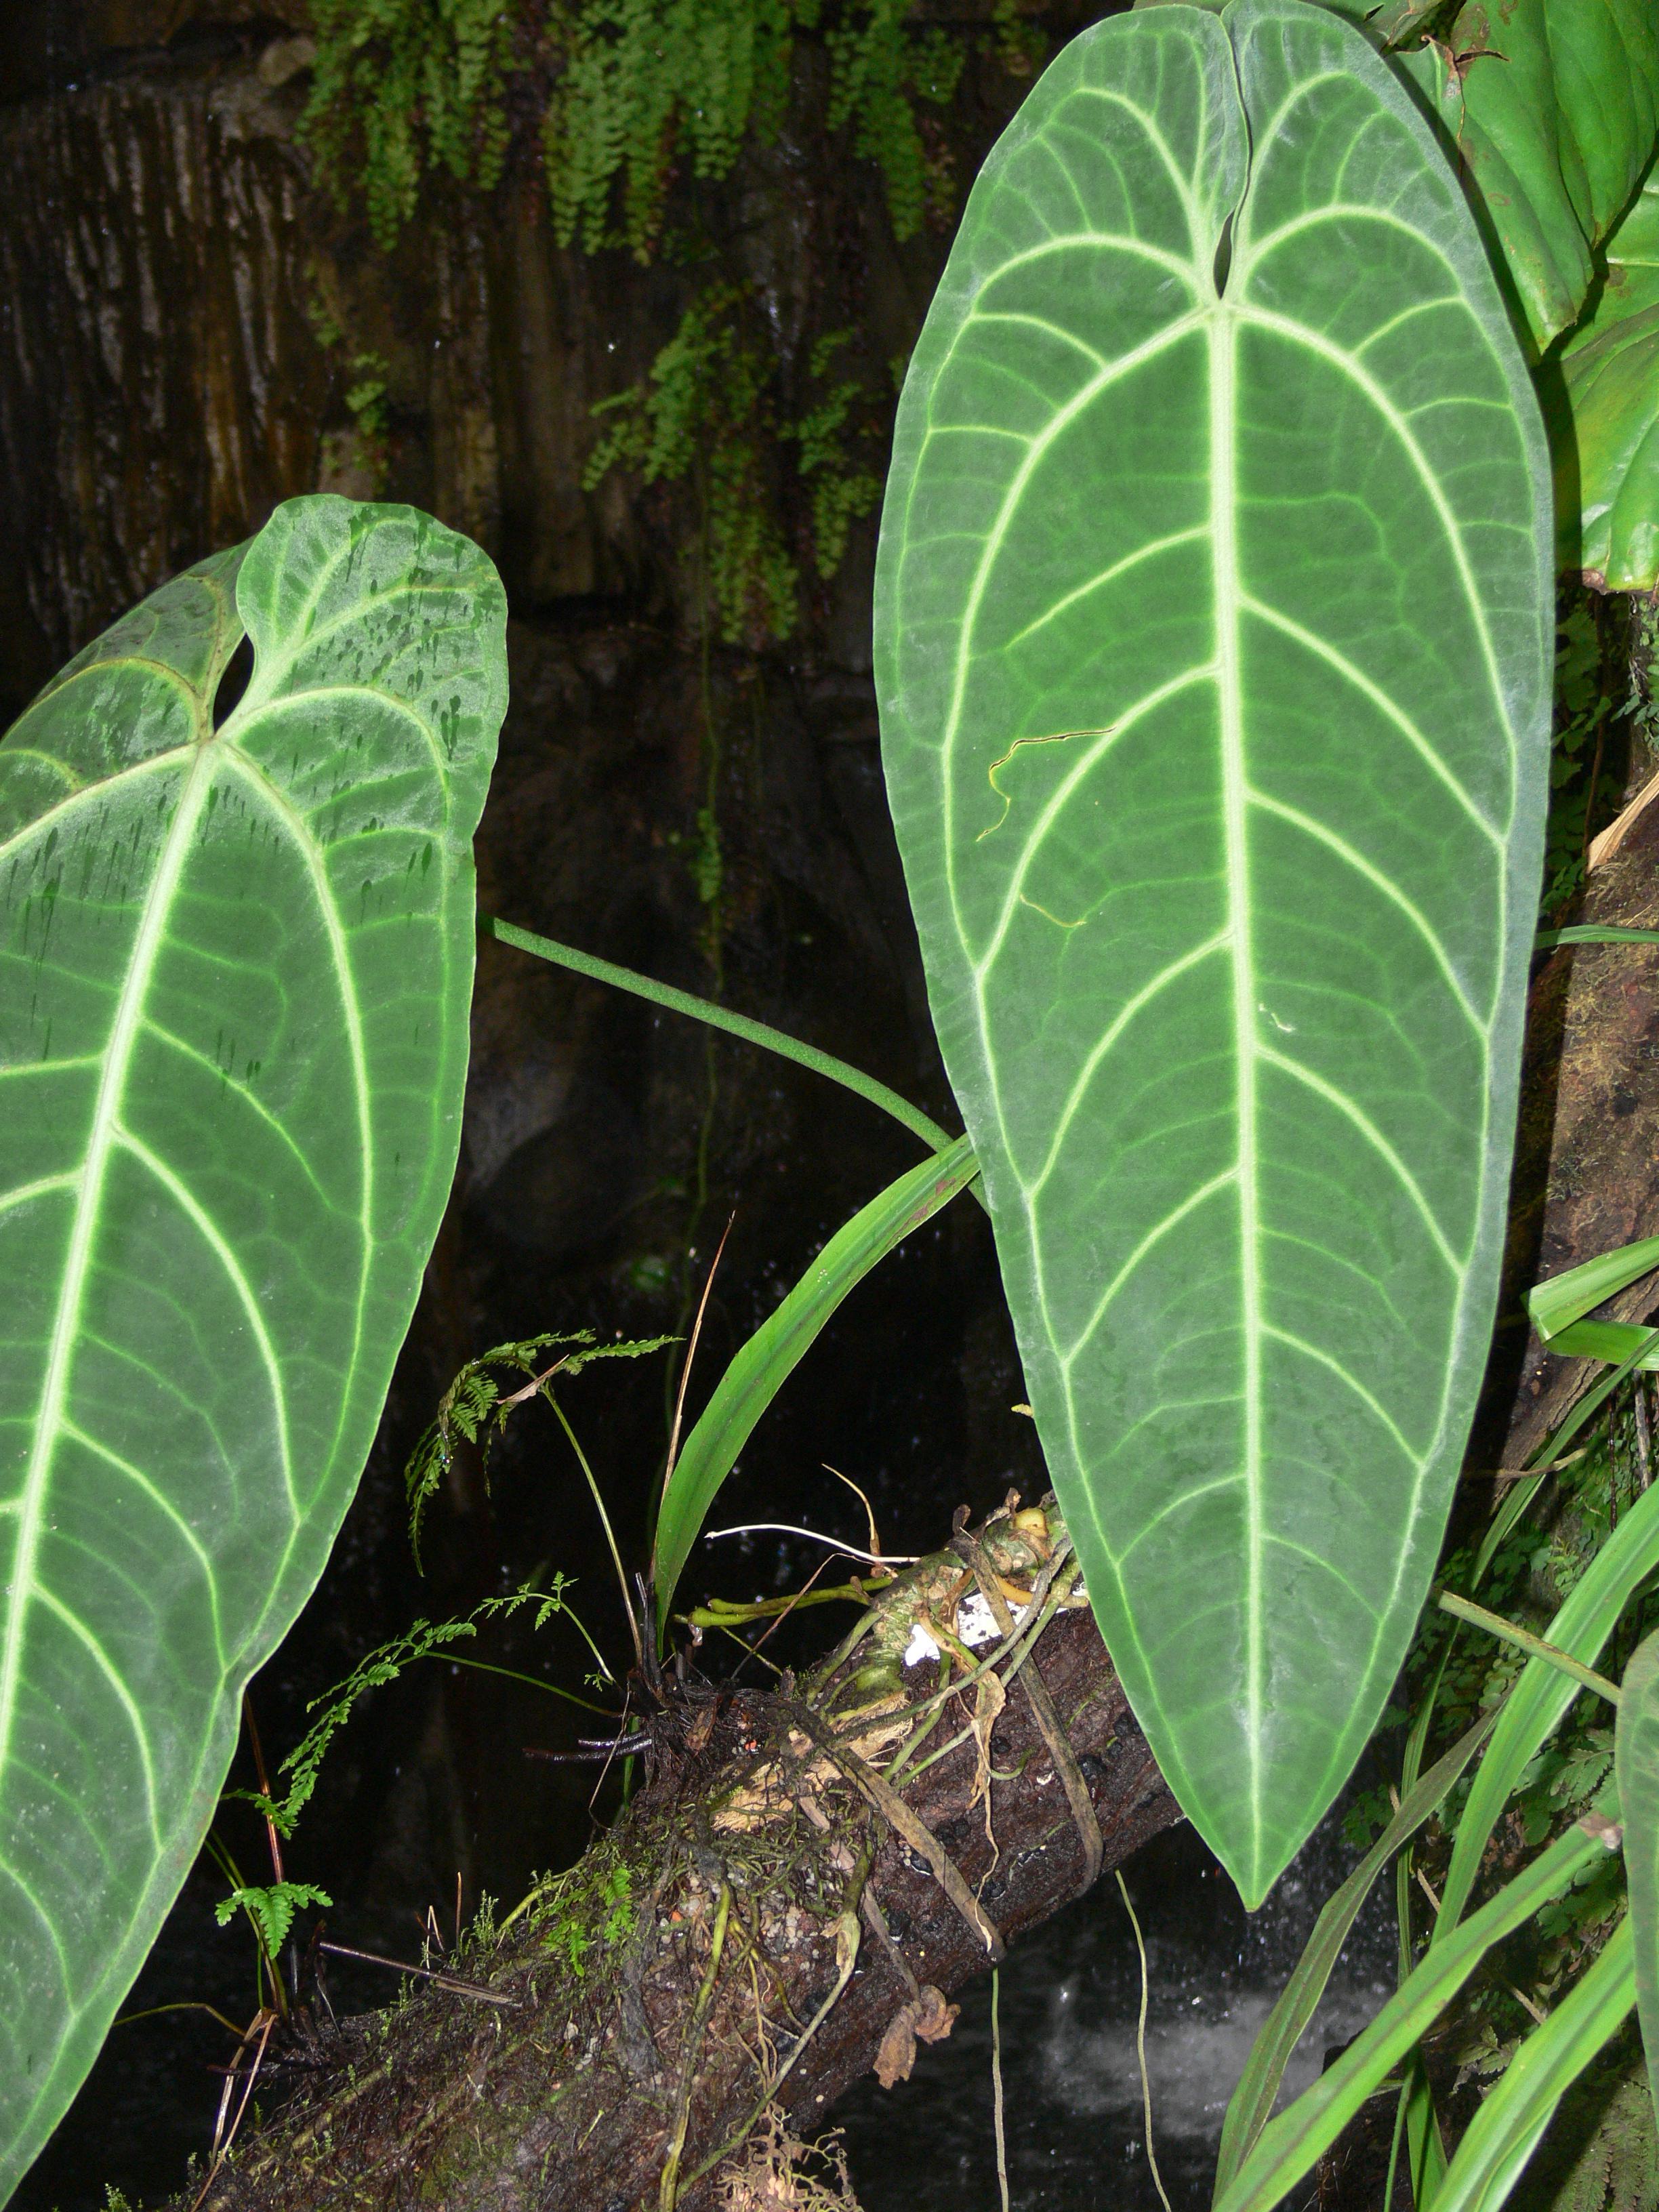
Queen anthurium, Anthurium warocqueanum, is a tropical aroid prized for its long, pendant leaves and striking, velvety texture. It is usually grown as a high-humidity foliage specimen rather than for flowers.

In nature it occurs in Colombian rainforests, where it grows as an epiphyte, anchoring to trees rather than soil. This origin explains its need for warm, stable conditions and airy, moisture-retentive substrates.

The plant is considered challenging because it reacts quickly to low humidity, poor airflow, and unstable watering. Understanding how to care for Queen Anthurium starts with providing bright filtered light, consistent moisture, and good root oxygenation.

Main Plant Requirements

Care Difficulty

Hard Care

Light Preference

Bright Indirect Light

Water Requirements

Keep Soil Moist

Temperature Preference

Tropical / Frost Sensitive

Hardiness Zone

11–13

Soil Texture

Loamy, Peaty, Organic-rich

Soil pH

Acidic (5.5–6.5)

Soil Drainage

Moist but well-drained

Fertilization

Light (every 4–6 weeks)

Get Personalized Care Plan

Scan your plant to receive care tips personalized for your specific plant

Personalized Care in the App

Available on iOS and Android

How to Care for the Queen Anthurium

This species prefers bright, indirect light that mimics high-canopy tropical forest conditions.

  • Provide 8–10 hours of bright, filtered light daily, such as dappled shade or behind a sheer curtain; soft morning sun is acceptable, but avoid harsh midday rays.
  • Tolerates partial shade, but in very low light the Queen Anthurium will produce smaller leaves, elongated petioles, and slower growth.
  • If leaf edges bleach, yellow, or develop dry brown patches, reduce direct sun exposure; in winter, move slightly closer to the light source to maintain intensity.

Anthurium warocqueanum requires evenly moist but never waterlogged substrate around its fine roots.

  • Water when the top 2–4 cm of the mix feels dry, using thorough watering that allows excess to drain away, then empty any standing water promptly.
  • Reduce frequency in winter or in low light, waiting for the top layer to dry a bit more, and increase slightly during active warm-season growth.
  • Signs of overwatering include yellowing lower leaves, limp foliage, and sour-smelling mix; crisp edges, drooping petioles, and very light pots suggest underwatering or hydrophobic substrate.

This aroid thrives in consistently warm, humid conditions with minimal temperature swings.

  • Aim for 70–80°F (21–27°C) for strong growth; short dips to 65°F (18°C) are tolerated but growth will slow.
  • Avoid temperatures below 55°F (13°C), as chilling injury, leaf darkening, and root stress can occur; the plant is not frost tolerant.
  • In hot spells above 85°F (29°C), increase humidity and airflow while shielding from intense sun to limit leaf scorch and heat stress, especially around the root zone.

This species needs high, stable humidity to keep leaves large and healthy.

  • Aim for 70–85% humidity; growth slows and margins crisp when levels drop below ~60%.
  • In dry air, leaf tips brown, edges curl, and new leaves emerge smaller or deformed.
  • Use a room humidifier, water trays near the plant, and group plants to raise local humidity, while keeping air gently moving to prevent fungal issues.

Anthurium warocqueanum prefers a very airy, chunky, organic-rich medium that drains fast but stays lightly moist.

  • Use a mix such as 40% fine orchid bark, 30% perlite or pumice, 20% coco coir or peat, and 10% compost or worm castings.
  • Ensure the mix is loose and fibrous so water runs through in seconds while thin particles still hold moisture around roots.
  • Keep pH slightly acidic, around 5.5–6.5, which supports nutrient uptake and reduces micronutrient lockout.
  • Avoid dense potting soil, unamended garden soil, or mixes that stay wet for days, as these encourage root rot and suffocation.

This species grows well in containers when the pot supports its tall, leaf-heavy growth and moisture-sensitive roots.

  • Select a tall, slightly narrow pot to give vertical root depth and keep the root zone evenly moist without waterlogging the base.
  • Choose a breathable material such as terracotta or fabric if the mix stays wet too long, or plastic if conditions are very dry.
  • Place the container in a heavy cachepot or weight the base so the plant does not tip as leaves elongate and concentrate mass high above the pot.

Anthurium warocqueanum benefits from light, consistent feeding during active growth for strong foliage.

  • Apply a balanced liquid fertilizer (around 10-10-10 or 20-20-20) diluted to 1/4–1/2 strength every 4–6 weeks in spring and summer.
  • Use a slow-release fertilizer sparingly in a chunky aroid mix, avoiding direct contact with roots to prevent burn.
  • Pause or reduce feeding to once every 8–10 weeks in fall and winter when growth slows.
  • Flush the pot with plain water every 4–6 weeks to clear accumulated salts that may damage roots.

Pruning Anthurium warocqueanum is mainly hygienic, keeping foliage healthy and manageable.

  • Carry out light pruning in spring or early summer when the plant is actively growing.
  • Remove yellowing, dead, or mechanicaly damaged leaves at the base with clean, sharp scissors or pruning shears.
  • Thin crowded or overlapping leaves to improve airflow and reduce fungal issues in high-humidity setups.
  • Trim spent inflorescences to direct energy toward new foliage rather than seed production.

This species prefers a stable environment, so repotting Anthurium warocqueanum is done only when clearly needed.

  • Repot every 1–2 years or when roots circle the pot, grow through drainage holes, or growth slows despite good care.
  • Plan repotting for late spring to early summer so roots recover quickly in warm, bright, humid conditions.
  • Move into a container only 2–5 cm wider, using a coarse, fast-draining mix to limit root disturbance and waterlogging.
  • Gently loosen circling roots, keep as much rootball intact as possible, then water lightly and maintain high humidity for 1–2 weeks.

Propagation of Anthurium warocqueanum is usually done on established plants and requires controlled conditions.

  • Use stem cuttings with at least 1–2 nodes and a healthy aerial root section, taken in late spring or early summer.
  • Place cuttings in moist, airy substrate (such as moss and perlite) at 75–82°F with high humidity and bright, indirect light.
  • Keep the medium just moist and ensure good airflow to reduce rot while roots form over several weeks.
  • Division of large plants is possible but stressful, so separate only a few well-rooted sections and pot individually.

This plant is tropical and highly sensitive to cold, so winter care focuses on stable indoor conditions.

  • Keep indoor temperatures around 68–78°F and never below 60°F, avoiding cold drafts and window chill.
  • Move plants away from single-pane glass at night or provide insulation between foliage and cold surfaces.
  • Reduce watering slightly in winter, keeping the mix barely moist and never waterlogged.
  • Maintain 60–80% humidity with a humidifier or enclosure while providing bright, indirect light to prevent decline.

Care Tips

Secure Leaf Support

Provide tall, stable stakes or a moss pole and loosely tie the long leaves in several places so their weight does not crease or snap the midrib as they elongate.

Use Rooting Anchors

Pin thick aerial roots against a moist, chunky substrate using soft ties or plant clips to encourage them to attach and form a stronger, more resilient root system.

Gentle Air Movement

Run a small fan on a low setting near, but not directly at, the plant to reduce fungal leaf spots and help large leaves dry more evenly after misting or cleaning.

Acclimate After Import

After shipping or repotting, place the plant in slightly lower light with very stable humidity and avoid any major changes for 2–3 weeks to allow roots and leaves to recover before adjusting conditions for growing Queen Anthurium.

Targeted Pest Checks

Inspect the leaf undersides, midrib, and petiole bases weekly with a flashlight, and wipe these areas with a damp cloth or alcohol-moistened cotton swab at the first sign of scale, mites, or mealybugs to prevent infestations from spreading along the large foliage.

Common Pests and Diseases

Spider mites

This pest thrives on the thin, leathery foliage of Queen Anthurium, especially in warm, dry indoor air. Symptoms include tiny pale stippling, dull leaves, and very fine webbing along midribs and undersides.

Solution

Rinse foliage thoroughly with lukewarm water, focusing on leaf undersides, then follow with repeated applications of insecticidal soap or horticultural oil every 5–7 days until no new damage appears. Increase humidity to 60–80%, improve air movement without drafts, and isolate the plant from others to prevent spread.

Thrips

These insects are attracted to the large, velvety leaves and can cause silvery streaks, distorted new growth, and black specks of frass on foliage. Damage often appears first on the newest, softest leaves and along primary veins.

Solution

Prune and discard the most damaged leaves, then use a combination of sticky traps to monitor adults and targeted sprays of insecticidal soap or neem oil on both sides of the leaves. For heavier infestations, combine foliar treatment with a systemic insecticide labeled for indoor ornamentals and reduce plant stress by maintaining stable warmth and humidity.

Bacterial blight

This disease causes water-soaked, translucent patches on leaves that quickly turn brown or black with yellow halos, often starting along leaf margins or at mechanical injury sites. In high humidity and poor airflow, lesions can expand rapidly and lead to large dead areas on the leaf blade.

Solution

Immediately remove and discard affected leaves and any fallen debris, sterilizing cutting tools between cuts with alcohol. Reduce overhead watering, increase airflow around foliage, avoid water sitting on leaves, and if the spread continues, apply a copper-based bactericide according to label directions, ensuring the plant is kept in a warm but not overly humid microclimate during recovery.

Fungal leaf spot

This disease appears as multiple small, round to irregular spots that may be tan, brown, or dark with a defined border, often coalescing into larger patches on mature leaves. Symptoms include gradual yellowing around the spots and premature leaf drop, especially in overcrowded, humid setups.

Solution

Improve spacing and airflow, avoid wetting leaves, and allow the top of the potting mix to dry slightly between waterings while keeping roots evenly moist. Remove the worst affected leaves and treat remaining foliage with a broad-spectrum fungicide labeled for ornamental foliage plants, repeating as directed until new growth appears clean.

Mealybugs

This pest hides in leaf axils, along midribs, and around petiole bases, leaving cottony white masses and sticky honeydew that can attract sooty mold. Symptoms include slowed growth, yellowing patches, and weakened new leaves that fail to reach full size.

Solution

Manually remove visible clusters with cotton swabs dipped in isopropyl alcohol, then wash the plant with lukewarm water to clear residues. Follow with repeated treatments of insecticidal soap or neem oil, paying special attention to leaf axils and stem crevices, and quarantine the plant until no new mealybugs appear.

Interesting Facts

Velvety leaf structure

The deep velvet look of its leaves comes from dense microscopic hairs that scatter light, a surface adaptation that helps protect the leaf from intense rainforest glare and excess water loss.

Elongated pendant foliage

Mature leaves can grow extremely long and hang down in a pendant fashion, an adaptation that lets the plant capture light efficiently in shaded, vertical rainforest habitats.

Specialized climbing habit

In its native Colombian forests, this species grows as an epiphyte or hemi-epiphyte on tree trunks, using aerial roots to anchor to bark while taking up moisture and nutrients from organic debris rather than soil.

Botan icon

Did you know?

Wild specimens have been documented with individual leaves over 1.5 m long, which is one reason Anthurium warocqueanum is considered one of the largest-leaved species grown by aroid collectors.

FAQs about Queen Anthurium

Brown tips or edges usually result from low humidity, salt buildup from fertilizer, or past underwatering. Large brown patches may indicate leaf burn from direct sun or root rot. Remove damaged leaves and correct the underlying issue.

Grow Healthy Plants with Botan Care

Keep your plants happy and healthy with plant identification, disease detection, and easy care guidance.

Botan plant care app — identify plants on mobile

Explore More Plants