
narrowleaf onion Care (Allium amplectens)

narrowleaf onion

About narrowleaf onion

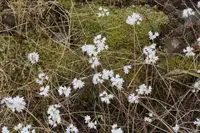
Narrowleaf onion, Allium amplectens, is a small bulb-forming perennial in the onion family, grown for its delicate white to pale pink star-shaped flowers. It forms loose clumps of slender, grasslike leaves and airy flower umbels that appear above the foliage in late spring to early summer.

This species is native to western North America, often found in open woodlands, grassy slopes, and rocky hillsides. It is generally easy to grow in gardens because it tolerates poor, well-drained soils and seasonal dry periods.

Once established, it usually needs little attention, which makes it suitable for low-maintenance borders, rock gardens, and naturalized plantings. Understanding how to care for narrowleaf onion mainly involves providing sun, good drainage, and avoiding overly wet conditions around the bulbs.

Main Plant Requirements

Care Difficulty

Easy Care

Light Preference

Full Sun

Water Requirements

Low Water

Temperature Preference

Cold Hardy

Hardiness Zone

4–8

Soil Texture

Sandy, Loamy, Rocky

Soil pH

Slightly acidic (6.5–7.0), Neutral (7.0)

Soil Drainage

Well-drained

Fertilization

Minimal (feed rarely)

Get Personalized Care Plan

Scan your plant to receive care tips personalized for your specific plant

Available on iOS and Android

How to Care for the narrowleaf onion

This sun-loving bulb thrives in open, bright positions typical of dry meadows and slopes.

  • Provide 6–8 hours of direct sun daily; morning sun with light afternoon shade is ideal in hotter regions.
  • Tolerates light or dappled shade for part of the day, but narrowleaf onion will produce fewer, weaker blooms with less than 4–5 hours of sun.
  • In hot, dry summers, protect from intense late-afternoon sun to reduce leaf scorch and premature yellowing.

This species prefers dry to moderately moist conditions and is sensitive to waterlogged soil.

  • Allow the top 3–5 cm of soil to dry between waterings; in the ground, water only when the soil feels dry at finger depth.
  • During active spring growth, water deeply but infrequently, ensuring sharp drainage so Allium amplectens bulbs do not sit in standing water.
  • Reduce or stop watering once foliage yellows and dies back; soft, collapsing bulbs suggest overwatering, while shriveled bulbs indicate prolonged drought.

This hardy bulb is adapted to climates with cool, moist springs and warm, dry summers.

  • Active growth and flowering occur best at 55–70°F (13–21°C), with bulbs resting comfortably in warmer, drier summer soil.
  • Established plants tolerate winter lows near 10–15°F (-12 to -9°C) in well-drained soil; colder areas may need mulch for extra insulation.
  • In summer, plants handle 80–90°F (27–32°C) if soil is dryish; prolonged heat above 95°F (35°C) with high moisture increases rot risk.

Humidity is not a significant factor for Allium amplectens, which prefers dry air similar to typical heated indoor homes.

Allium amplectens prefers well-aerated, fast-draining mineral soils that prevent waterlogging around the bulbs.

  • Use a sandy or gritty loam with 30–50% coarse sand or fine gravel to keep the soil open around the bulb.
  • Incorporate a small amount of compost or leaf mold to provide nutrients without making the mix heavy or water-retentive.
  • Aim for slightly acidic to neutral pH, around 6.0–7.2, avoiding strongly acidic or alkaline conditions that restrict nutrient uptake.
  • Avoid dense clay, poorly drained spots, or low-lying areas where water collects and bulbs remain wet for more than 24 hours.

This species is suitable for container growing when the potting setup mimics its preference for fast drainage and a dry rest period.

  • Choose a deep, heavy container that provides at least 15–20 cm of root depth so the bulb can set roots without tipping the pot.
  • Use a gritty, low-organic mix such as 50–60% mineral material (pumice, coarse sand, grit) to prevent the bulb zone from staying wet.
  • Raise the pot on feet or bricks outdoors so drainage holes stay clear and excess water cannot pool under the container after rain.

This bulb is light-feeding, so use modest nutrition to support flowering without forcing soft growth in narrowleaf onion.

  • Apply a balanced, slow-release fertilizer (around 10-10-10) at half strength once in early to mid-spring as new leaves emerge.
  • Supplement with a thin layer of compost around, not over, the bulbs to improve soil structure and gentle nutrient supply.
  • Avoid further feeding after flowering; let foliage yellow naturally so bulbs can store energy without excess nitrogen.
  • Do not fertilize during summer dormancy or winter, especially in rich or amended garden soils.

Pruning needs for Allium amplectens are minimal and focus on cleanliness rather than shaping.

  • In late spring to early summer, deadhead spent flower stems at the base to prevent unwanted self-seeding and keep clumps tidy.
  • Leave green foliage intact until it yellows and collapses; this allows photosynthesis to recharge the bulbs for next year’s bloom.
  • Remove only dead, damaged, or diseased leaves using clean, sharp scissors or hand pruners to reduce infection risk.
  • Avoid cutting healthy leaves for appearance, since heavy removal can weaken bulbs and reduce flowering the following season.

Transplanting or lifting Allium amplectens is done infrequently, mainly to relieve crowding or adjust planting location.

  • Check clumps every 3–5 years; tight clusters, reduced flowering, or bulbs pressing against container sides suggest it is time to move or divide.
  • Plan transplanting for late summer to early fall, when the plant is dormant and foliage has fully died back.
  • Gently lift bulbs with a fork, keeping roots and basal plate intact, and replant at the same depth in well-drained soil.
  • Water lightly after replanting to settle soil, then keep conditions on the dry side to limit rot and reduce transplant shock.

Propagation of Allium amplectens is commonly done by bulb division, with seed used mainly for larger, long-term increases.

  • Divide offset bulbs in late summer to early fall, when plants are dormant and foliage has disappeared.
  • Lift clumps carefully, separate firm, healthy bulbs, and replant them at similar depth with 10–15 cm spacing.
  • For seeds, sow fresh in fall outdoors or use cold stratification, a chilling period, to break dormancy.
  • Provide gritty, well-drained soil and moderate moisture; avoid overwatering young bulbs to prevent rot while roots establish.

This species is generally cold hardy in much of the US and needs little active winter care in the ground.

  • Established garden bulbs tolerate typical winter frost, provided soil drains well and does not stay waterlogged.
  • In colder or exposed sites, add a light mulch layer after the ground cools to buffer freeze–thaw cycles around bulbs.
  • For containers, move pots to a sheltered, unheated spot and keep the mix just barely moist to prevent desiccation or rot.

Care Tips

Bulb clump management

Lift and divide overcrowded clumps every 3–4 years in late summer after foliage has fully died back to maintain flowering strength and prevent bulbs from competing for space and nutrients.

Targeted weed suppression

Apply a thin gravel or grit mulch (0.5–1 in) around the bulbs in fall to minimize weed pressure while keeping the necks of the bulbs exposed so they do not rot.

Rodent protection

In areas with vole or gopher activity, plant bulbs in buried wire mesh baskets or cages so roots can grow through while the bulbs remain protected from chewing damage.

Companion planting strategy

Position these bulbs among low, open-textured perennials or fine grasses so the fading foliage is visually masked after bloom while still receiving full light for bulb recharge.

Seed-head handling

If self-sowing is desired, allow seed heads to dry on the plant and then gently shake them over the bed, but if you want tight clumps when growing narrowleaf onion, remove seed heads soon after bloom to direct energy back into the bulbs.

Common Pests and Diseases

Onion thrips

This pest pierces leaf tissue and sucks out sap, leading to silvery streaks, tiny black specks, and gradual leaf weakening on Allium species.

Solution

Reduce plant stress with regular watering in dry spells, then use a strong stream of water to wash insects off foliage and surrounding soil surface; if damage continues, apply a narrow-range horticultural oil or insecticidal soap directed into leaf bases and repeat at 5–7 day intervals during warm, dry periods.

Allium leaf miner

This pest lays eggs at the leaf base, and larvae tunnel inside leaves and scapes, causing twisting, yellow streaks, and collapse of flower stems.

Solution

Remove and destroy infested leaves and flower stems as soon as damage is seen, avoid composting them, and use fine insect mesh over outdoor plantings during the main egg-laying periods; in regions where this insect is established, rotate planting sites and avoid growing Allium species in the same spot year after year.

Bulb mites

These insects feed inside bulbs, especially in stored or poorly drained sites, leading to soft spots, reduced vigor, and weak or stunted shoots the following season.

Solution

Inspect bulbs before planting and discard any that are soft or show brown, crumbly tissue, then plant in well-drained soil or raised beds; keep bulbs dry but not desiccated in storage, and rotate out of infested beds for several years to reduce mite populations.

Downy mildew

This disease causes pale yellow patches on leaves that later develop grayish-purple, fuzzy growth on the undersides, leading to premature leaf dieback and weaker bulbs.

Solution

Increase spacing and airflow, avoid overhead irrigation late in the day, and remove and discard infected foliage promptly; in areas with repeated outbreaks, water only at soil level and consider shifting Allium plantings to sunnier, better-ventilated locations as part of long-term Allium amplectens care.

Neck rot

This disease attacks bulbs at the neck, especially in storage, causing sunken, soft areas that develop gray mold and eventually destroy the bulb.

Solution

Cure bulbs thoroughly after lifting by drying them in a warm, airy place for 7–14 days, then store only firm, uninjured bulbs in a cool, dry, well-ventilated area; avoid damaging necks during harvest, and remove any bulbs that show softening or mold to prevent spread.

Interesting Facts

Native West Coast specialist

This species is native to western North America, especially California and southern Oregon, where it grows in open woodlands, grassy slopes, and rocky sites that dry out completely in summer.

Distinctive clasping leaves

Its species name amplectens refers to the way its narrow grasslike leaves clasp or partially wrap around the flowering stem, a trait that helps distinguish it from several similar wild onions.

Early-season pollinator resource

Flowering typically peaks in late spring to early summer, providing nectar and pollen for native bees, small flies, and butterflies during a transitional period when many other wildflowers are already fading.
Botan icon

Did you know?

In parts of its native range, indigenous peoples traditionally used the bulbs and leaves of this wild onion as a seasonal food, carefully harvesting in ways that allowed clumps to regenerate and persist in the landscape over time.

FAQs about narrowleaf onion

Yes, this species is edible and has a mild onion flavor. Bulbs, leaves, and flowers can be used sparingly in salads, garnishes, and cooked dishes. Always confirm identification and avoid collecting from polluted or treated areas.

Grow Healthy Plants with Botan Care

Keep your plants happy and healthy with plant identification, disease detection, and easy care guidance.
Botan plant care app — identify plants on mobile

Explore More Plants