
Tillandsia australis Care

Tillandsia australis

About Tillandsia australis

Tillandsia australis is an epiphytic air plant native to parts of South America, where it grows attached to trees, rocks, or other structures. It belongs to the bromeliad family and absorbs water and nutrients mainly through its leaves, not roots.

The plant typically forms rosettes of narrow, often slightly curling leaves that may show a grayish or silvery coating. This coating, made of tiny scales called trichomes, helps the plant capture moisture from the air.

Its ability to grow without soil and its moderate light needs make it relatively manageable for indoor growers. Understanding how to care for Tillandsia australis mostly comes down to providing bright, indirect light, good air circulation, and regular but not constant moisture.

Main Plant Requirements

Care Difficulty

Moderate Care

Light Preference

Bright Indirect Light

Water Requirements

Low Water

Temperature Preference

Tropical / Frost Sensitive

Hardiness Zone

10–12

Soil Texture

Rocky, Sandy, Organic-rich

Soil pH

Acidic (5.5–6.5)

Soil Drainage

Well-drained

Fertilization

Light (every 4–6 weeks)

Get Personalized Care Plan

Scan your plant to receive care tips personalized for your specific plant

Available on iOS and Android

How to Care for the Tillandsia australis

This species needs bright, indirect light with some gentle direct sun to photosynthesize well without leaf damage.

  • Provide 3–5 hours of soft morning sun with bright, filtered light the rest of the day; avoid harsh midday sun that can cause leaf bleaching or scorching.
  • Tolerates light, shifting shade for part of the day, but growth slows and color fades if it receives less than about 6 hours of bright ambient light.
  • In summer, increase distance from hot west-facing exposures; in winter, move Tillandsia australis closer to the brightest window or use a grow light for 8–10 hours.

This air plant absorbs moisture through its leaves, so focus on wetting the foliage rather than any roots.

  • Soak or thoroughly mist the plant until fully wet, then let it dry within 2–3 hours; in warm, dry conditions this is typically needed every 2–4 days, less often in humid climates.
  • Increase watering frequency when leaf tips curl inward or feel very stiff and brittle, and decrease if the base stays soft or develops a musty smell, which indicates overwatering.
  • Always provide strong air circulation after soaking or heavy misting, tilting the plant so no water pools in leaf bases to reduce rot risk for Tillandsia australis.

Stable, mild temperatures support healthy growth and reduce stress for this air plant.

  • Aim for 65–80°F (18–27°C) for active growth, with slightly cooler nights; this range supports efficient photosynthesis and recovery after watering.
  • Short dips to 50°F (10°C) are usually tolerated if the plant is dry, but exposure below 45°F (7°C) and any frost can cause permanent tissue damage.
  • In hot weather above 90°F (32°C), move the plant to bright shade, increase air movement, and adjust watering so it dries quickly between soakings to prevent heat stress.

This air plant prefers moderate to high humidity but adapts to typical indoor levels if watering is consistent.

  • Aim for 40–60% humidity, using room conditions plus regular misting or soaking to compensate for drier air.
  • It tolerates short periods of dry air, but leaf tips may brown and curl if humidity and watering are both low.
  • Increase humidity locally by grouping plants, placing near (not in) a pebble tray, or using a small humidifier during very dry months.

This species is epiphytic and does not need traditional soil, but it benefits from a well-aerated mounting or loose, inorganic medium.

  • Avoid regular potting soil; instead use very open materials such as coarse bark, large perlite, lava rock, or horticultural charcoal.
  • If placed in a container, keep Tillandsia australis resting on top of a loose mix so air circulates freely around all sides of the plant base.
  • Use media that drain and dry quickly after watering to prevent rot, never allowing water to pool around the central rosette.
  • Rinse media occasionally to prevent salt buildup, which can damage leaf surfaces and reduce root and leaf function.

This air plant can be grown in containers as long as the setup preserves strong air flow and rapid drying after watering.

  • Use shallow, wide containers that allow the plant to sit above the media, with space for air movement around the leaves and base.
  • Choose unglazed clay or other breathable materials that let trapped water evaporate quickly and reduce the risk of rot.
  • Stabilize the plant with decorative stones or wire supports so it does not shift during watering, which can damage new growth.

This species grows on air and debris, so Tillandsia australis benefits from only light, occasional feeding.

  • Use a balanced, water‑soluble epiphyte or orchid fertilizer at 1⁄4 strength to avoid leaf burn.
  • Feed every 3–4 weeks in spring and summer when growth and flowering are most active.
  • Mist or soak the plant in the diluted solution, then allow good air circulation for quick drying.
  • Reduce feeding to once every 6–8 weeks in fall and winter, or pause if light and growth are very low.

Pruning needs are minimal and focus on sanitation rather than shaping for Tillandsia australis.

  • Trim only dead, brown, or damaged leaves, cutting close to the base with clean, sharp scissors or snips.
  • Remove spent flower stalks after blooming to direct energy back to vegetative growth and offsets.
  • Thin out severely crowded clumps by taking a few outer rosettes, which maintains airflow and reduces rot risk.
  • Carry out pruning in warm, dry weather so cut surfaces dry quickly and disease risk stays low.

This air plant is usually mounted rather than potted, so repotting focuses on refreshing mounts and improving anchoring.

  • Consider remounting when the clump overgrows its support, tips hang in stagnant air, or growth slows despite good light and water.
  • Best timing is spring to early summer, when temperatures are stable and recovery is fastest.
  • Detach the plant gently, keeping the basal area intact, and tie or glue it onto fresh cork, wood, or inert rock with good airflow.
  • Handle roots and bases lightly, avoid burying any part in soil, and keep the plant slightly drier for several days to limit stress.

Propagation of Tillandsia australis is most reliable through offsets rather than seed for home growers.

  • Allow clumps to form; offsets (pups) are ready when about 1⁄2–2⁄3 the size of the parent rosette.
  • Detach pups in spring or early summer using clean fingers or a sterile knife at the base junction.
  • Remount each offset on airy material and secure gently so it does not wobble during rooting and attachment.
  • Provide bright, indirect light, good air movement, and slightly more frequent misting until new leaves or roots show firm establishment.

Cold sensitivity means this species needs protection from freezing conditions in most climates.

  • Aim to keep temperatures above 40°F; prolonged exposure near or below freezing can damage foliage and meristems.
  • Move mounted or container plants indoors or into a bright greenhouse before hard frosts arrive.
  • Place in bright, filtered light with strong air circulation and reduce watering so foliage dries quickly in cooler air.
  • Avoid placing near heating vents or very dry spots; moderate indoor humidity helps limit leaf tip desiccation.

Care Tips

Mounting strategy

Attach plants to open, rigid mounts such as cork bark or hardwood using soft wire or biodegradable ties, leaving the base exposed so air can circulate freely around the roots and prevent rot.

Airflow management

Place plants where they receive steady, gentle air movement from a ceiling or oscillating fan, which helps them dry promptly after misting and reduces fungal and bacterial issues.

Post-bloom maintenance

After flowering, leave the mother plant in place while pups develop, then separate offsets only when they reach about one-third to one-half the size of the parent to maintain vigor in the clump.

Seasonal light shifts

Change the plant’s position slightly between summer and winter, moving it closer to bright windows in winter and a little further back in intense summer sun to keep leaf color even and avoid scorch.

Travel and absence plan

Before travel longer than 5–7 days, give plants a thorough soak, then group them near a bright, airy window so the shared humidity and stable light help maintain health while caring for Tillandsia australis with minimal supervision.

Common Pests and Diseases

Scale insects

This pest feeds on leaf surfaces and the leaf bases, causing yellowing, dull color, and weakened growth in air plants. Symptoms include small, rounded, tan to brown bumps that feel hard and are often clustered along the leaf sheaths.

Solution

Isolate the plant, then gently scrub affected areas with a soft brush or cotton swab dipped in 70% isopropyl alcohol, taking care not to damage the trichomes (leaf scales). Rinse thoroughly with room‑temperature water, let the plant dry quickly in bright, airy conditions, and repeat treatment weekly until no new insects appear.

Mealybugs

These insects hide in leaf axils and at the base of the rosette, sucking sap and leaving cottony white masses. Symptoms include sticky residue, leaf tip dieback, and a general decline in vigor.

Solution

Remove visible insects with a soft brush or cotton swab dipped in 70% isopropyl alcohol, then rinse the entire plant under a strong but gentle stream of water. Improve airflow, avoid standing water trapped in the leaf bases, and repeat inspection and spot treatment every 5–7 days until the infestation stops.

Foliar rot

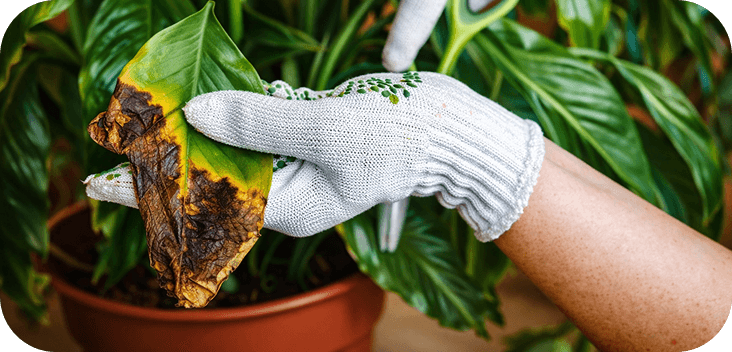
This disease develops when water sits for long periods in the leaf bases, especially in cool, low‑airflow conditions, leading to soft, brown or black tissue. Symptoms include a sour odor, leaves pulling away easily at the base, and a rapid collapse of the central rosette.

Solution

Remove and discard all soft, discolored tissue with sterile scissors, cutting back to firm, healthy leaves if possible. Allow the plant to dry completely in bright, indirect light with strong airflow, then adjust watering to brief soaks or thorough rinses in the morning, ensuring the plant dries fully within a few hours as part of Tillandsia australis care instructions.

Fungal leaf spots

This disease appears as small, dark, sometimes water‑soaked spots that may merge into larger blotches on the stiff leaves. Symptoms include cosmetic damage and, in severe cases, localized tissue death where spots coalesce.

Solution

Improve air circulation, reduce prolonged leaf wetness, and avoid misting late in the day so foliage can dry before night. Remove severely spotted leaves with sterile scissors, then keep the plant in brighter, drier, well‑ventilated conditions to prevent new lesions from forming.

Spider mites

These insects thrive in hot, very dry indoor air and feed on leaf cells, causing fine stippling and a dull, grayish cast on the foliage. Symptoms include very fine webbing in the inner leaf bases and slowed growth over time.

Solution

Rinse the plant thoroughly under a strong, lukewarm shower, focusing on the leaf undersides and inner rosette, and repeat every few days for 2–3 weeks. Increase ambient humidity slightly, maintain strong airflow, and keep the plant in bright indirect light, which discourages mite populations and supports recovery.

Interesting Facts

Southern Andean specialist

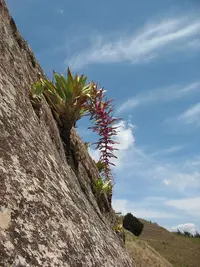
This species is native to high-elevation regions of southern South America, especially in Argentina and Bolivia, where it grows on rocks and shrubs exposed to strong light and large daily temperature swings.

Robust saxicolous habit

Tillandsia australis is primarily saxicolous, meaning it often anchors directly onto rock surfaces, using small root-like holdfasts for attachment while absorbing nearly all water and nutrients through its leaves.

Striking upright inflorescence

Mature plants produce a tall, upright flower spike with showy, often reddish to pink bracts and tubular flowers, an adaptation that helps attract hummingbirds and large pollinating insects in its native range.
Botan icon

Did you know?

In cultivation, growers often use its strong preference for bright, cool, and airy conditions as a reference model when explaining how to take care of Tillandsia australis compared with more shade-adapted air plants from lowland tropical forests.

FAQs about Tillandsia australis

This species usually needs to reach maturity and experience bright light, good air circulation, and stable warmth to flower. Stress from low light, irregular watering, or sudden temperature swings often delays blooming or prevents flower spike formation.

Grow Healthy Plants with Botan Care

Keep your plants happy and healthy with plant identification, disease detection, and easy care guidance.
Botan plant care app — identify plants on mobile

Explore More Plants