
Russian Hollyhock Care (Alcea rugosa)

Russian Hollyhock

About Russian Hollyhock

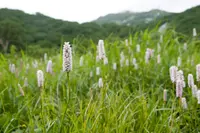
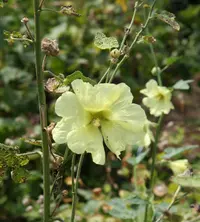
Russian hollyhock (Alcea rugosa) is a tall, long-lived perennial grown mainly for its vertical spires of soft yellow, saucer-shaped flowers. It usually forms a clump of rough, lobed leaves at the base, with sturdy flowering stems that create a strong vertical accent in cottage-style or naturalistic borders.

This species is native to steppe and meadow regions of Eastern Europe and Russia, so it is adapted to open, sunny habitats and relatively dry conditions. It is generally considered easier to manage than many traditional hollyhocks, with better resistance to rust and a tough, drought-tolerant nature.

Gardeners who want to care for Russian Hollyhock should provide full sun, reasonably well-drained soil, and protection from prolonged waterlogging for best performance.

Main Plant Requirements

Care Difficulty

Easy Care

Light Preference

Full Sun

Water Requirements

Moderate Water

Temperature Preference

Cold Hardy

Hardiness Zone

4–8

Soil Texture

Sandy, Loamy, Clay

Soil pH

Slightly acidic (6.5–7.0), Neutral (7.0)

Soil Drainage

Well-drained

Fertilization

Minimal (feed rarely)

Get Personalized Care Plan

Scan your plant to receive care tips personalized for your specific plant

Available on iOS and Android

How to Care for the Russian Hollyhock

Alcea rugosa performs best in strong outdoor light with some protection from the harshest afternoon sun.

  • Provide 6–8 hours of direct sun daily, ideally with full morning sun and light or filtered afternoon sun in hotter regions.
  • Plant in an open, unshaded spot; Russian Hollyhock tolerates light partial shade (3–4 hours sun), but flowering and stem strength decrease as shade increases.
  • In hot summers, monitor for leaf scorch or bleaching, which signal excess sun and heat; in low light, expect taller, weaker stems and fewer blooms.

Alcea rugosa prefers evenly moist but not saturated soil, with brief drying between waterings.

  • Allow the top 3–5 cm of soil to dry before deep watering, soaking the root zone rather than giving light, frequent splashes.
  • Use well-drained soil; water less on heavy clay and more often on sandy ground, watching for limp, dull leaves as a sign of drought stress.
  • Reduce watering in cool, rainy periods; yellowing lower leaves, soft stems, or a sour smell in the soil suggest overwatering and poor drainage.

This hardy perennial tolerates a wide temperature range but grows best in moderate warmth.

  • Active growth and flowering are strongest around 65–80°F (18–27°C), with sturdy stems and consistent bud formation in this range.
  • Established plants survive winter cold down to about -20°F (-29°C) in the ground, but young plants benefit from mulch in their first 1–2 winters.
  • In hot spells above 90°F (32°C), growth can slow and flowers may scorch, so soil moisture and light mulching help buffer root temperatures.

Alcea rugosa handles a wide humidity range and usually needs no special humidity management outdoors.

Alcea rugosa prefers deep, well-drained, moderately fertile soil that does not stay waterlogged.

  • Use a loamy or sandy-loam texture with plenty of coarse particles so water drains within a few hours after thorough watering.
  • Incorporate 20–30% garden compost to improve structure, moisture retention, and nutrient availability without making the soil heavy.
  • Aim for slightly alkaline to neutral pH around 6.8–7.5, avoiding strongly acidic substrates that reduce nutrient uptake and vigor.
  • On heavy clay sites, create raised beds and mix in coarse sand or fine gravel to increase aeration and prevent crown rot.

This tall, deep-rooted species is possible but not ideal for container growing and needs careful pot selection for stability.

  • Choose a deep, heavy container at least 40–50 cm tall to give the taproot room and reduce the risk of tipping in wind.
  • Anchor the pot by placing bricks or stones in the base below the drainage layer to counterbalance the tall flowering spikes.
  • Use a wide-based container rather than a narrow columnar pot to distribute weight and improve stability on patios or balconies.

Alcea rugosa benefits from modest feeding in nutrient-poor soils but often manages in reasonably fertile ground.

  • Use a balanced, slow-release granular fertilizer (around 10-10-10) or well-aged compost at the start of spring growth.
  • Feed once in spring and again midsummer during active growth, avoiding over-application in rich soils.
  • Apply at half the label rate for perennials, keeping fertilizer away from direct stem contact.
  • Stop feeding in late summer to early fall so plants can harden off before winter dormancy.

Alcea rugosa responds well to light, timely pruning that manages height and encourages flowering.

  • In late spring to early summer, remove dead, damaged, or pest-scarred leaves with clean bypass pruners.
  • Deadhead spent flower spikes down to healthy leaves to extend the blooming period and reduce self-seeding.
  • After flowering, cut back tall, leggy stems by up to one-third to improve shape and reduce wind damage.
  • In late fall, trim stems close to ground level once foliage yellows, then dispose of diseased material.

This deep-rooted perennial is usually grown in-ground; transplant carefully to avoid disturbing the taproot.

  • Transplant young plants in early spring or early fall, when weather is cool and soil moisture is steady.
  • Choose a site with full sun and well-drained soil, digging a deep hole to accommodate the long taproot.
  • Move plants only when necessary; circling roots in containers or stunted growth signal a needed size upgrade.
  • Water thoroughly after planting, then keep soil evenly moist for 1–2 weeks to limit transplant shock.

Alcea rugosa is most often propagated from seed, which tends to establish better than divided plants.

  • Sow seeds outdoors in late spring after frost or in late summer for natural cold exposure over winter.
  • Provide loose, well-drained soil and a lightly covered seed, as darkness plus moisture support germination.
  • Keep the seedbed evenly moist at 60–70°F until seedlings emerge, then thin to allow adequate spacing.
  • Division of young clumps in early spring is possible but may disturb the taproot, so handle roots gently.

This species is generally cold hardy and needs minimal winter care in most temperate climates.

  • After hard frost, cut back brown stems near ground level to reduce disease carryover.
  • Apply a 5–8 cm layer of mulch around the crown in late fall, keeping it slightly away from direct stem contact.
  • In very cold or exposed sites, use a breathable mulch such as straw or shredded leaves for extra root insulation.
  • Container-grown plants benefit from being placed in a sheltered, unheated but frost-free area over winter.

Care Tips

Use sturdy staking

Install strong stakes or a mesh support system early in the season and tie stems loosely with soft ties at 20–30 cm intervals to prevent wind damage and stem breakage as the plant gains height.

Plan for air flow

Space plants generously and remove lower, congested foliage in midsummer to improve air circulation and reduce the risk of rust and leaf spot spreading up the stems.

Monitor for rust

Inspect leaves weekly from late spring for orange or brown pustules on the undersides, remove and dispose of affected foliage promptly, and avoid overhead watering to limit further infection while growing Russian Hollyhock.

Rotate planting sites

Change the planting location every 3–4 years and avoid sites where hollyhocks or related mallows recently grew to lower the buildup of soil-borne diseases and pests specific to this group.

Encourage self-sowing

Allow a portion of seed heads to dry fully on the stalk, then shake or crumble the seed into nearby bare soil in late summer to maintain a natural succession of plants without formal replanting.

Common Pests and Diseases

Hollyhock rust

This disease causes yellow to orange spots on upper leaf surfaces with brown powdery pustules on the undersides, often leading to premature leaf drop. Symptoms include the plant looking tattered from the bottom up during the season.

Solution

Remove and dispose of heavily infected leaves as soon as they appear, and clean up all fallen foliage at the end of the season to reduce spores. Improve spacing and airflow, avoid overhead watering, and in climates with recurring problems use a labeled fungicide early in the season on lower leaves according to the product instructions.

Japanese beetles

These insects skeletonize foliage, leaving only leaf veins, and often chew flower petals. Damage can be heavy during their short summer flight period.

Solution

Hand-pick beetles in the early morning and drop them into soapy water, repeating daily during peak activity. Avoid using traps near the planting, protect key plants with fine mesh netting when beetle pressure is high, and support plant recovery with good watering and fertilization after the main flight period.

Hollyhock weevil

This pest feeds on buds and developing seeds, causing small holes and distorted flowers, and larvae develop inside seed capsules. Infestations can reduce flowering quality and seed set.

Solution

Inspect flower buds regularly and remove and destroy damaged buds and spent seed heads to break the life cycle. In gardens with repeated issues, shake plants over a sheet in early morning to dislodge adults and consider using a contact insecticide labeled for ornamental weevils if cultural measures are not sufficient.

Spider mites

These pests cause fine stippling and a dull, grayish cast on leaves, sometimes with delicate webbing in dry, hot weather. Symptoms include lower leaves yellowing and drying out prematurely.

Solution

Rinse foliage thoroughly with a strong but gentle stream of water, including the undersides of leaves, repeating every few days until populations drop. Increase humidity around the plants where possible, remove heavily damaged leaves, and if needed apply insecticidal soap or horticultural oil labeled for mites, making sure to cover leaf undersides.

Leaf spots (Cercospora and others)

This disease complex produces small brown to purplish spots that may merge into larger blotches, leading to yellowing and early leaf loss. Symptoms include cosmetic damage and reduced vigor, especially in warm, humid weather.

Solution

Prune or pinch off affected lower leaves and dispose of them, and avoid wetting foliage when watering to limit spread. Provide good spacing and airflow, rotate plantings if possible, and in persistent cases use a suitable ornamental foliar fungicide applied at the first sign of spotting as part of broader Alcea rugosa care instructions.

Interesting Facts

Natural steppe specialist

This species is native to dry steppe and rocky slopes of southern European Russia and nearby regions, so it is unusually tolerant of drought and poor, stony soils compared with many ornamental hollyhocks.

Distinct yellow flowers

Unlike most commonly grown hollyhocks, which are pink, red, or white, this species produces clear yellow, saucer-shaped flowers that make it easy to distinguish even when growing alongside other Alcea species.

Robust, long-lived habit

While many garden hollyhocks behave as short-lived biennials, this species can be a relatively long-lived perennial in suitable conditions, forming sturdy clumps that return for several years.
Botan icon

Did you know?

This species has been used in hybridization work as a parent to introduce clear yellow flower color and increased hardiness into ornamental hollyhock lines, making it a valuable genetic resource for breeders interested in Alcea rugosa care instructions.

FAQs about Russian Hollyhock

Lack of flowers usually comes from too little light, excess nitrogen fertilizer, or young age. Plants grown from seed often need a full season to establish before flowering heavily in the second year and beyond.

Grow Healthy Plants with Botan Care

Keep your plants happy and healthy with plant identification, disease detection, and easy care guidance.

Botan plant care app — identify plants on mobile

Explore More Plants