Green Kalossie Care (Ixia viridiflora)

Also known as: Turquoise Kalossie, Turquoise Ixia, Azure Kalossie, Green Ixia
Green Kalossie

About Green Kalossie

Green Kalossie (Ixia viridiflora) is a bulb-forming flowering plant from the iris family, valued for its unusual turquoise to green star-shaped blooms. It grows from small corms and typically sends up slender, upright stems with narrow, grass-like leaves and loose flower spikes.

This species is native to the winter-rainfall regions of South Africa, where it experiences cool, moist winters and dry summers. It can be somewhat challenging outside mild climates, mainly due to its need for a dry dormant period and protection from hard frost.

Gardeners who want to learn how to care for Green Kalossie should note its preference for bright light, excellent drainage, and moderate moisture while actively growing.

Main Plant Requirements

Care Difficulty

Moderate Care

Light Preference

Full Sun

Water Requirements

Moderate Water

Temperature Preference

Warm Climate

Hardiness Zone

9–11

Soil Texture

Sandy, Loamy, Organic-rich

Soil pH

Acidic (5.5–6.5), Slightly acidic (6.5–7.0)

Soil Drainage

Well-drained

Fertilization

Light (every 4–6 weeks)

Get Personalized Care Plan

Scan your plant to receive care tips personalized for your specific plant

Available on iOS and Android

How to Care for the Green Kalossie

Ixia viridiflora needs bright, direct sun to flower well and form strong stems.

  • Provide 6–8 hours of direct sun daily; full morning sun with light afternoon shade suits most climates.
  • In hot summer areas, protect from harsh sun between 1–4 p.m. with high, open shade or nearby plants to reduce leaf scorch on Green Kalossie.
  • Avoid deep shade, which causes weak, floppy growth and poor flowering; in short-day seasons, choose the sunniest, south-facing spot available.

This bulb prefers moderate, well-timed watering with a pronounced dry rest after flowering.

  • During active growth and flowering, water when the top 3–5 cm of soil are dry; soil should feel slightly moist, never soggy.
  • Use sharply drained soil so water runs through quickly; persistent surface wetness or a swampy smell suggests overwatering and risk of bulb rot in Ixia viridiflora.
  • After leaves yellow and die back, reduce watering sharply or allow natural rainfall only, keeping the soil nearly dry during dormancy.

This species grows best in mild, frost-free conditions with a distinct cool season and dry summer rest.

  • Optimal active growth range is 60–75°F (16–24°C); cooler nights around 50–55°F (10–13°C) help support sturdy stems.
  • Bulbs tolerate brief dips to 28–30°F (-2– -1°C) once established, but repeated hard frosts below 25°F (-4°C) can kill them without mulching or lifting.
  • In hot regions, ensure summer dormancy stays dry if temperatures exceed 90°F (32°C), as heat plus wet soil increases rot risk.

Humidity plays only a minor role for Ixia viridiflora, which adapts well to typical indoor and outdoor levels.

Ixia viridiflora grows best in sharply draining, sandy or gritty soil that stays airy around the corms.

  • Use a mix of roughly 50–60% coarse sand or grit, 20–30% loam, and 10–20% compost for moderate nutrients.
  • Aim for slightly acidic to neutral soil, around pH 6.0–7.0, to support balanced nutrient uptake.
  • Improve aeration and drainage further by adding perlite or fine gravel, especially in heavier native garden soils.
  • Avoid dense, clay-heavy, or water-retentive mixes that keep corms wet for long periods, as this encourages rot.

This species is well suited to container growing, especially in regions with wet winters or cool springs.

  • Choose a pot at least 20–25 cm deep so the corms can be planted 7–10 cm down with space for root spread.
  • Use a heavy terracotta or ceramic container if wind exposure is high, as the tall flowering stems can make the pot top-heavy.
  • Elevate the pot on feet or bricks so water drains freely from the base and the lower mix does not stay saturated.

Ixia viridiflora is a light feeder that benefits from modest nutrition in its active growth phase.

  • Apply a balanced liquid fertilizer (around 10-10-10) at half strength every 2–3 weeks from shoot emergence until flowering.
  • Use a light top-dressing of fine compost in early spring to enrich sandy or poor soils.
  • Avoid feeding during summer dormancy or winter, as inactive corms can rot if overfed.
  • For Green Kalossie in pots, choose a low-dose slow-release bulb fertilizer mixed into the top 2–3 in of soil at planting.

Ixia viridiflora needs only minimal pruning focused on hygiene rather than shaping.

  • After flowering, snip off spent flower spikes at the base using clean, sharp scissors to keep the plant tidy.
  • Leave green foliage intact until it yellows naturally so corms can recharge for next season’s blooms.
  • Remove only dead, damaged, or diseased leaves to reduce fungal problems and improve air flow.
  • Avoid cutting into healthy corms or green shoots, as this does not enhance flowering or plant form.

This bulbous plant is usually grown as a seasonal clump and is not repotted often like foliage houseplants.

  • Plan to lift and divide crowded clumps every 3–4 years when flowering declines or stems become thin.
  • Dig corms in late summer to early fall after foliage has completely died back and the soil is fairly dry.
  • Gently loosen soil and separate offsets, keeping roots and basal plates intact to reduce stress.
  • Replant corms 5–8 cm deep in fresh, well-drained soil, water lightly once, then allow them to resettle without disturbance.

New Ixia viridiflora plants are typically raised from offsets or seed under controlled conditions.

  • Divide corm offsets in late summer or early fall once foliage has died back and clumps are lifted.
  • Select firm, healthy corms with visible growing points, discarding any soft or moldy pieces.
  • For seed, sow fresh seed in shallow trays of gritty mix, barely covering, and keep at 60–68°F with bright light.
  • Maintain slightly moist, not wet, conditions until seedlings develop several leaves, then pot on gently to avoid root damage.

This species is not strongly frost hardy and needs thoughtful winter care in cooler climates.

  • In mild climates with light frosts, apply a 5 cm layer of dry mulch over the planting area after foliage dies back.
  • In colder regions, lift corms before hard freezes, dry them in a cool airy place, then store in paper bags at 40–50°F.
  • Keep stored corms dry and check periodically for rot, discarding any that become soft or shriveled.
  • Move container-grown plants under cover or indoors before frost, ensuring the soil stays barely dry during dormancy.

Care Tips

Staggered Bulb Planting

Plant corms in small batches 1–2 weeks apart in late winter or early spring so flowering is spread over a longer period and you have a continuous display rather than one short flush.

Support For Slender Stems

Insert discreet slim stakes or low mesh supports at planting time, then gently tie stems with soft ties as they elongate to prevent wind damage and lodging when the flower spikes are in full bloom.

Rotate Containers Outdoors

If grown in pots, rotate containers a quarter turn every 7–10 days during active growth so all sides receive similar light exposure and the flower spikes develop straight rather than leaning toward one direction.

Post-Bloom Deadheading

As individual flowers fade on a spike, snip them off while leaving the green stem and leaves intact so the plant can continue photosynthesizing and channel energy back into the corm for next season.

Lift And Cure Corms

In regions with wet or cold winters, lift corms once foliage has fully yellowed, gently brush off soil, then cure them in a dry, airy place for 7–10 days before storing in labeled paper bags or mesh trays at 45–55°F to maintain viability for the next planting cycle.

Common Pests and Diseases

Gladiolus thrips

This pest feeds on flowers and foliage, causing silvery streaks, pale spotting, and distorted or browned blooms. Symptoms include reduced flowering quality and a general lack of vigor, especially in warm, dry weather.

Solution

Inspect buds and leaves regularly, then remove and discard heavily damaged flower spikes and surrounding plant debris. Rinse plants with a strong stream of water, use blue or yellow sticky traps near the planting, and apply an insecticidal soap or spinosad-based spray labeled for thrips, repeating according to label directions until new growth appears clean.

Bulb mite

These insects attack corms in storage or poorly drained soil, creating tiny pits and corky brown areas that weaken emerging shoots. Symptoms include poor sprouting, deformed growth, and corms that shrivel or decay more quickly.

Solution

Discard any soft, strongly damaged corms and keep only firm, clean stock, then dry and store them in a cool, well-ventilated place. Before storage or planting, lightly dust corms with a sulfur-based bulb treatment if available, and avoid overwatering or planting in heavy, wet soil that favors mite and fungal buildup.

Corm rot

This disease is caused mainly by soil fungi that invade damaged or stressed corms, leading to brown, sunken lesions, internal rot, and collapse of shoots. Symptoms include yellowing, stunted growth, and plants that wilt or fail to flower despite normal watering.

Solution

Lift and discard any plants with obviously rotting corms and remove surrounding soil or organic debris. Plant only healthy, firm corms in sharply drained, sandy soil, rotate planting sites, avoid overhead watering, and treat lifted corms with a labeled fungicidal bulb dip or sulfur dust before drying and storage to reduce reinfection.

Botrytis blight

This disease develops in cool, humid conditions and causes brown, water-soaked spots on leaves, stems, and flowers, often covered with gray fuzzy mold. Symptoms include flower bud failure and rapid collapse of affected tissue during prolonged wet weather.

Solution

Promptly remove and discard infected leaves, flowers, and spent flower spikes, and improve spacing and airflow so foliage dries quickly after rain or irrigation. Water at the soil level in the morning, avoid wetting the blooms, and if the problem recurs, apply a labeled ornamental fungicide preventively during extended cool, damp periods.

Aphids

These insects cluster on young stems and flower stalks, sucking sap and excreting sticky honeydew that can lead to sooty mold on leaves. Symptoms include distorted new growth, curling foliage, and reduced flower quality.

Solution

Wash colonies off with a firm spray of water and pinch off heavily infested shoot tips if practical. Encourage or introduce natural predators such as lady beetles, and when necessary use insecticidal soap or a horticultural oil, coating the undersides of leaves and repeating at 5–7 day intervals until populations are controlled.

Interesting Facts

Unusual turquoise petals

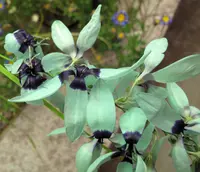
The flowers have a rare turquoise to green-blue coloration with a dark purple to almost black central blotch, a combination seldom seen in flowering plants and highly prized by collectors.

Winter-growing geophyte

This species grows from a small underground corm, sending up leaves and flowering stems in the cool, wet South African winter, then going dormant and leafless through the hot, dry summer.

Fynbos habitat specialist

In the wild it is naturally restricted to sandy, well-drained soils in the South African Western Cape fynbos, a fire-prone shrubland biome known for its very high plant diversity and endemism.
Botan icon

Did you know?

In its native range this species is considered rare in the wild, partly because of habitat loss and transformation of its specialized fynbos habitat, so most plants in cultivation now come from propagated stock rather than wild collection.

FAQs about Green Kalossie

Lack of flowers usually comes from insufficient winter dormancy, bulbs planted too shallow, or depleted nutrients. Ensure a cool, dry rest after foliage dies back, replant at correct depth, and use a balanced, low-nitrogen bulb fertilizer.

Grow Healthy Plants with Botan Care

Keep your plants happy and healthy with plant identification, disease detection, and easy care guidance.
Botan plant care app — identify plants on mobile

Explore More Plants