Mulch Maids Care (Leratiomyces percevalii)

Mulch Maids

About Mulch Maids

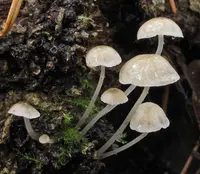
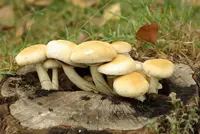
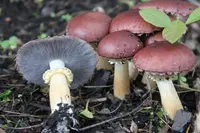
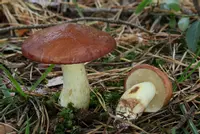
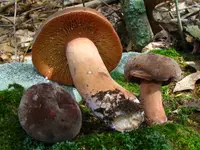
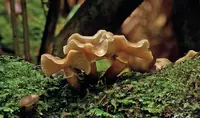
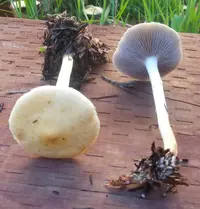
Mulch Maids is a common name sometimes used for Leratiomyces percevalii, a small saprophytic mushroom that lives in wood chip mulch and other rich organic debris. It is a fungus, not a leafy houseplant, and appears as clusters of pale to tan caps with slender stems emerging directly from the mulch surface.

This species is found in temperate regions, especially in landscaped beds, gardens, and paths where fresh mulch is regularly applied. It tends to appear after rain or irrigation, then disappear as conditions dry.

Because it feeds on decaying wood, it does not harm nearby plants and cannot be “trained” or pruned. Gardeners who care for Mulch Maids mainly manage it by adjusting mulch moisture and physical removal when needed.

Main Plant Requirements

Care Difficulty

Moderate Care

Light Preference

Partial Shade

Water Requirements

Keep Soil Moist

Temperature Preference

Cool Climate

Hardiness Zone

Unknown

Soil Texture

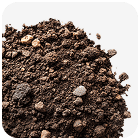
Loamy, Organic-rich

Soil pH

Slightly acidic (6.5–7.0)

Soil Drainage

Moist but well-drained

Fertilization

Minimal (feed rarely)

Get Personalized Care Plan

Scan your plant to receive care tips personalized for your specific plant

Available on iOS and Android

How to Care for the Mulch Maids

Leratiomyces percevalii, often seen as Mulch Maids, fruits best with bright, indirect light and mild sun exposure.

  • Provide 3–5 hours of gentle morning sun with dappled or filtered light the rest of the day, especially in open beds or mulched areas.
  • Allow partial shade, particularly in hot summers; protect from harsh midday and afternoon sun that can dry the substrate too quickly.
  • In summer, light shade from shrubs or trees helps maintain moisture; in cooler seasons, slightly more direct sun supports reliable fruiting.

Water management focuses on consistently moist, well-drained substrate rather than a fixed schedule.

  • Irrigate when the top 3–5 cm of mulch or soil feels slightly dry but still cool, avoiding both dust-dry and soggy conditions.
  • Use a loose, well-draining organic layer; standing water or sour, swampy smells indicate overwatering and poor aeration.
  • After heavy rain, allow partial drying before watering again; slow or absent fruiting can signal chronic dryness, while slimy caps often follow waterlogged conditions.

Stable, mild temperatures support reliable development and fruiting of this fungus.

  • Optimal fruiting usually occurs around 55–70°F (13–21°C), with mycelium growth continuing somewhat outside this range if moisture is steady.
  • Tolerates brief dips near 40°F (4°C) but repeated freezes or hard frosts can damage surface growth and reduce subsequent flushes.
  • Sustained heat above 80–85°F (27–29°C) dries substrates quickly; provide shade and extra moisture during hot spells to prevent mycelium stress.

This saprophytic fungus tolerates a wide humidity range and rarely needs special humidity control outdoors or in pots.

This species fruits best in loose, moist, organic-rich substrates that drain freely yet hold steady moisture.

  • Use a mix of shredded wood chips, composted bark, and leaf litter to mimic decomposing mulch where Leratiomyces percevalii naturally grows.
  • Aim for a crumbly, airy texture that allows water to pass through quickly but leaves the substrate evenly damp, not soggy.
  • Maintain slightly acidic to neutral conditions around pH 6.0–7.0, avoiding strongly alkaline materials such as heavy lime additions.
  • Avoid compacted, clay-heavy, or waterlogged ground; if soil is dense, incorporate coarse bark, wood chips, or perlite to improve aeration and drainage.

This mulch-loving fungus can be grown in containers if the substrate and drainage are carefully managed.

  • Choose a broad, shallow container to spread a 10–20 cm layer of woody mulch, which provides more surface area for fruiting bodies to emerge.
  • Use a rigid plastic or thick-walled container to retain moisture more evenly while still allowing the substrate surface to dry slightly between waterings.
  • Elevate the pot on feet or bricks so drainage holes stay clear, preventing pooled water that can turn the lower mulch layer anaerobic.

Leratiomyces percevalii, often seen in mulched beds, usually grows well without added fertilizer in nutrient-balanced garden soils.

  • If growth or fruiting host plants look weak, use a light top-dressing of compost once in spring to gently enrich the substrate.
  • For container cultures, apply a balanced liquid NPK fertilizer at 1⁄4 strength every 4–6 weeks during active growth.
  • Pause feeding in winter or any dormant phase, when soil temperatures are low and fungal activity slows.
  • Avoid high-salt synthetic products; excess nutrients can disrupt soil microbes and reduce overall fungal vigor.

Leratiomyces percevalii does not require true pruning, but some maintenance helps manage appearance and spore spread.

  • Best timing for cleanup is after caps collapse or dry, removing spent fruiting bodies at the base.
  • Cut or pinch off damaged, moldy, or insect-infested mushrooms to limit unwanted spore release and decay odors.
  • Use clean gloves or a small knife, then discard or bag removed material rather than composting on-site.
  • Light harvesting of intact caps naturally shapes the patch and can modestly reduce future density.

This fungus is usually managed by adjusting its substrate rather than traditional repotting, especially when it appears in landscape mulch or container mixes.

  • Transplant or relocate colonized mulch only if dense fruiting interferes with use or aesthetics around paths or seating areas.
  • Best timing is in cool, moist weather in spring or fall, which limits desiccation of the underlying mycelium.
  • If grown experimentally in containers, shift to fresh, well-drained organic substrate when growth declines or the mix becomes sour.
  • Handle colonized material gently, keep it slightly moist, and shade it for several days after moving to reduce mycelial stress.

Leratiomyces percevalii spreads mainly by spores and through expansion of its mycelium in suitable organic substrates.

  • Allow a few mature caps to release spores over fresh woodchip or bark mulch to encourage natural colonization.
  • Colonized mulch chunks can be moved and partially buried in new beds during mild, moist spring or fall weather.
  • Maintain consistently moist, not waterlogged, conditions and moderate shade to support mycelial spread and fruiting.
  • Avoid aggressive soil disturbance; keeping the upper 5–10 cm of mulch relatively stable improves establishment.

This species is generally cold hardy in temperate climates and needs minimal targeted winter care.

  • In garden beds, a stable layer of organic mulch insulates mycelium from rapid freeze–thaw cycles.
  • Container substrates can freeze solid; move experimental pots to a sheltered, unheated but frost-moderated spot if possible.
  • Do not water heavily in cold spells; keep the substrate just barely moist so tissues do not rot in cold, saturated conditions.

Care Tips

Rotate substrate trays

If you are fruiting in trays or beds, rotate them 90° every 2–3 days so developing caps receive more even airflow and light cues, which helps produce straighter, more uniform mushrooms and reduces uneven drying on one side.

Use breathable covers

Instead of sealing colonizing containers with airtight lids, use micropore tape or a fitted lid with gas‑exchange holes to maintain high CO₂ for colonization while still allowing minimal fresh air to reduce bacterial growth and off odors.

Partial harvest technique

Harvest clusters in stages by cutting mature caps at the base and leaving firm, smaller pins undisturbed, which can extend the flush and increase total yield from the same substrate block.

Targeted surface rehydration

After a heavy flush, lightly mist only the exposed substrate surface and sidewalls of the container rather than soaking the entire block, which reduces the risk of waterlogging while still restoring moisture for the next wave of fruiting when caring for Mulch Maids.

Spore load management

If many caps are maturing at once, harvest just before the gills drop heavy spore loads to keep air filters, fans, and nearby surfaces cleaner and to lower the risk of respiratory irritation in enclosed fruiting spaces.

Common Pests and Diseases

Fungus gnat larvae

This pest lives in very wet potting mixes and can feed on tender fungal mycelium and young pins, slowing or distorting mushroom formation.

Solution

Allow the substrate surface to dry slightly between waterings, improve airflow, and use fine mesh or sticky traps to reduce adult gnats; for indoor Leratiomyces percevalii care, a biological control such as Bacillus thuringiensis israelensis (BTI) in the watering water helps target larvae without harming the fungus when used as directed.

Mite infestations

These insects include various soil and substrate mites that can graze on mycelium, developing primordia, and gills, leaving pitted, malformed, or aborted caps.

Solution

Lower mite pressure by keeping substrate clean, avoiding contaminated outdoor soil or compost, and promptly removing heavily damaged flushes; in persistent cases, use heat treatment of dry tools and containers, and consider predatory mites from reputable suppliers as a targeted biological control.

Bacterial blotch

This disease appears as greasy, water-soaked, or yellow-brown spots on caps, often linked to standing water on the fruiting bodies and poor air movement.

Solution

Reduce overhead misting directly onto caps, focus moisture on the substrate, and increase gentle airflow to dry mushroom surfaces; discard severely affected mushrooms and disinfect tools and trays with a dilute food-safe sanitizer between cycles to reduce bacterial load.

Green mold contamination

This disease, often caused by Trichoderma species, shows as bright to dark green patches in the substrate that overrun white mycelium and suppress mushroom formation.

Solution

Physically remove and discard heavily contaminated blocks or sections, improve hygiene of tools and containers, and adjust conditions to favor the crop fungus by avoiding excessive moisture, stagnant air, and unpasteurized, unbalanced substrates.

Competing saprophytic fungi

This problem occurs when other wild fungi colonize the same organic substrate, leading to patchy or no fruiting of the intended mushrooms.

Solution

Start with clean, well-pasteurized or properly sterilized substrate and spawn, keep containers covered with a breathable but physical barrier during colonization, and promptly discard any substrate that shows unfamiliar, off-odor, or strongly discolored growth to prevent wider contamination of the growing area.

Interesting Facts

Urban woodchip specialist

This mushroom is most often recorded in heavily mulched urban and suburban sites, especially on imported woodchip and bark, rather than in undisturbed natural forests.

Introduced, not native

It is considered a non-native species in many parts of Europe and North America, likely introduced with horticultural mulch and landscaping materials, and is now a familiar fungus in city beds, parks, and roadside plantings.

Blue-toned spore print

Its spores produce a distinctive dark purplish-brown to almost bluish-black spore print, which is a key microscopic and field character for distinguishing it from similar mulch-loving mushrooms.

FAQs about Mulch Maids

This fungus is not considered edible and should be treated as inedible. Identification of small brown mushrooms is difficult, and some similar species are toxic. Avoid tasting or using it as food under any circumstances.

Grow Healthy Plants with Botan Care

Keep your plants happy and healthy with plant identification, disease detection, and easy care guidance.
Botan plant care app — identify plants on mobile

Explore More Plants