jellied bird's nest fungus Care (Nidula candida)

jellied bird's nest fungus

About jellied bird's nest fungus

Jellied bird's nest fungus, Nidula candida, is a small saprophytic fungus that grows on decaying wood, bark, or plant debris. It is not a traditional houseplant but sometimes appears in terrariums or vivariums.

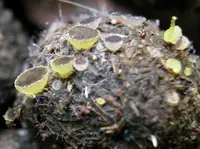
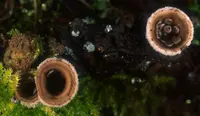
Its fruiting bodies look like tiny white nests filled with gelatinous eggs, which are actually spore-containing structures. These nests usually form in clusters and stay close to the substrate surface.

This species prefers consistently moist, shaded, well-ventilated conditions and organic, wood-rich material. Because it relies on specific decaying substrates and humidity levels, care for jellied bird's nest fungus is more about providing a stable microhabitat than active maintenance.

Main Plant Requirements

Care Difficulty

Moderate Care

Light Preference

Partial Shade

Water Requirements

Keep Soil Moist

Temperature Preference

Warm Climate

Hardiness Zone

Unknown

Soil Texture

Organic-rich, Peaty, Loamy

Soil pH

Acidic (5.5–6.5)

Soil Drainage

Moist but well-drained

Fertilization

Minimal (feed rarely)

Get Personalized Care Plan

Scan your plant to receive care tips personalized for your specific plant

Available on iOS and Android

How to Care for the jellied bird's nest fungus

This small saprophytic fungus prefers low to moderate light levels that mimic a shaded forest floor.

  • Provide bright shade or dappled light, such as light filtered through foliage or 2–3 hours of soft morning sun, avoiding direct midday or afternoon sun.
  • Ensure the site receives indirect daylight for at least 6–8 hours so fruiting bodies can form, but protect from harsh, exposed locations.
  • In hot summers, increase shade to prevent drying and bleaching; in darker seasons, remove obstructions that block limited natural light for jellied bird's nest fungus.

Moist but not waterlogged conditions are essential for healthy development of this decomposing fungus.

  • Maintain consistently damp substrate, allowing only the surface 1–2 cm to lose its sheen before adding water with a gentle spray or soak.
  • Use porous, well-drained organic matter such as decaying wood chips or leaf litter so excess water drains away and does not pool around Nidula candida.
  • Reduce watering in cooler seasons when evaporation slows, and watch for signs of stress like shriveling cups from dryness or slimy, collapsing tissue from overwatering.

Stable, cool to mild temperatures support reliable growth and fruiting of this species.

  • Aim for an optimal range of 60–75°F (16–24°C), where growth and spore cup formation are most consistent on decaying wood or litter.
  • Protect the fungus from frost, as tissue damage can occur below 32°F (0°C), and prolonged exposure near freezing often halts visible development.
  • Tolerate short warm spells up to about 80–82°F (27–28°C) only if humidity stays high, and provide extra shade and moisture buffering during hot, dry periods.

This fungus prefers consistently humid air similar to a damp forest floor.

  • Aim for 60–80% humidity; it declines in very dry rooms below about 40%.
  • Dry air leads to shriveling fruiting bodies and slower development of the jellied bird's nest fungus.
  • Increase humidity with a nearby open tray of water, grouped moisture-loving plants, or use in a terrarium-style enclosure.

Nidula candida grows best on moist, organic-rich substrate rather than standard potting soil.

  • Use a loose mix of fine bark, leaf litter, and well-rotted wood chips that mimics decaying forest debris.
  • Ensure rapid drainage; the substrate should stay evenly moist but never waterlogged or compacted.
  • A slightly acidic to neutral pH around 5.5–7 supports stable decomposition and fungal activity.
  • Improve aeration by blending in coarse sand or perlite so air can move between particles while still retaining moisture.

This species can be grown in shallow containers if the woody substrate and moisture are carefully managed.

  • Choose a wide, shallow tray so the decomposing wood layer stays thin and oxygen can reach the substrate surface.
  • Line the container with a breathable material, such as mesh or many side holes, to prevent stagnant, anaerobic pockets.
  • Select a container material that insulates slightly, like thick plastic or ceramic, to buffer rapid moisture and temperature swings in the substrate.

Nidula candida grows on decaying organic matter and usually needs no direct fertilization when that substrate is fresh and rich.

  • If growth slows because the woody substrate is exhausted, add a thin layer of well-rotted leaf mold or compost around the colony.
  • Avoid direct application of strong synthetic fertilizers; they can disrupt the delicate fungal mycelium.
  • Maintain moderate, stable moisture so nutrients from decaying material stay available without waterlogging.

Nidula candida does not require true pruning, but old fruiting bodies can be tidied for hygiene and appearance.

  • Remove spent or moldy cups by gently pinching or cutting them off at the base using clean tweezers or small scissors.
  • Avoid disturbing the underlying substrate, where the active mycelium grows and produces new fruiting bodies.
  • Tidying reduces clutter, improves visibility of fresh cups, and may lower the risk of secondary mold growth.

This fungus is usually grown on a fixed piece of wood or bark, so transplanting focuses on renewing its decaying substrate rather than classic repotting.

  • Transplant when cups appear sparse, the wood is heavily decomposed, or growth stalls despite good moisture.
  • Best timing is in mild conditions, typically spring or early fall, to reduce stress on the mycelium.
  • Move colonized substrate gently onto fresh, slightly decayed wood or bark, keeping orientation and moisture similar.
  • Handle minimally and keep the new setup evenly moist, not soaked, for 1–2 weeks so the colony can adjust.

Propagation of Nidula candida centers on spore dispersal and careful transfer of colonized substrate rather than classic plant methods.

  • Allow mature cups to release spores naturally onto nearby moist, decaying wood or bark placed close to the colony.
  • For a controlled method, move small pieces of colonized substrate onto fresh, slightly decomposed wood in a humid environment.
  • Best success occurs in warm, stable conditions with gentle airflow, high humidity, and indirect light.
  • Avoid drying or washing the substrate during transfer, as this can damage the fine mycelial network needed for establishment.

In most mild to cool climates, outdoor colonies of jellied bird's nest fungus on natural wood need little active winter care.

  • In regions with hard freezes, situate colonized wood in a sheltered, frost-sheltered spot such as under evergreen shrubs or eaves.
  • For containers, move logs or wood trays into a cold but frost-free porch, garage, or unheated greenhouse.
  • Maintain slightly moist substrate over winter, avoiding both complete drying and waterlogged conditions.

Care Tips

Substrate layering

Create a 2–3 cm top layer of fine, well‑rinsed sand or very fine grit over the main substrate to mimic natural splash zones and help the cups stay cleaner and more visible as they mature.

Controlled splash setup

Place a small, low‑flow drip or gentle mister above the colony to simulate rain splash, which helps disperse spores from the cups without physically disturbing or touching them.

Compact colony culture

Establish multiple small clusters on several shallow dishes or trays instead of one dense patch so you can rotate or replace sections easily if contamination or mold appears.

Hygienic tool use

Use dedicated, disinfected tweezers or chopsticks to remove spent cups and heavily decomposed organic fragments, reducing mold outbreaks while caring for jellied bird's nest fungus.

Observation and rotation

Inspect colonies with a hand lens every 3–5 days and gently rotate trays so all sides receive similar air movement and light, which encourages more even cup formation and reduces stagnant, mold‑prone pockets.

Common Pests and Diseases

Fungus gnats

These insects are attracted to constantly moist, organic-rich substrates and lay eggs in the fungal culture medium. Larvae feed on decaying material and fine mycelium, which can slow colony growth and introduce secondary infections.

Solution

Reduce excess surface moisture by allowing the top layer of the substrate to dry slightly between mistings, use fine mesh or insect-proof lids on containers, and place yellow sticky traps near cultures to intercept adults. If larvae are present, drench the substrate surface with a biological control such as Bacillus thuringiensis israelensis (Bti) according to label directions and remove heavily infested culture cups.

Mites

This pest often arrives on damp organic materials and can graze on spores and young fruiting bodies, leaving them abraded or deformed. Populations increase quickly in warm, stagnant, high-humidity setups.

Solution

Inspect cultures regularly with a hand lens and discard or isolate any containers showing fine webbing or moving specks on the substrate or fruiting bodies. Improve air exchange, slightly lower humidity, and, if needed, introduce predatory mites sourced for mushroom cultivation or restart clean cultures from uncontaminated material.

Green mold (Trichoderma)

This disease appears as dense white mycelium that rapidly turns bright to dark green on the substrate, often outcompeting Nidula candida and halting cup formation. Symptoms include a dusty green surface and a sour or strong earthy odor from contaminated cultures.

Solution

Immediately remove and discard contaminated culture vessels and any adjacent containers to limit spore spread, then clean the growing area and tools with 70% isopropyl alcohol or a dilute bleach solution. For growing jellied bird's nest fungus, start new cultures from clean material, use well-pasteurized or sterilized substrate, and reduce condensation and stagnant air that favor mold growth.

Bacterial blotch

This disease causes water-soaked, slimy patches on the substrate surface and occasionally on young fruiting bodies, which may collapse or discolor. Symptoms include a sour or putrid smell and persistent wet spots that do not dry under normal airflow.

Solution

Discard severely affected cultures to avoid spreading bacteria, and clean all tools and trays before reuse. Improve hygiene by using clean water for misting, reducing direct overhead spraying, increasing fresh air exchange, and keeping surfaces and containers dry between watering cycles.

Interesting Facts

Cup-shaped fruiting bodies

This species forms tiny, white, cup-shaped fruiting bodies that resemble miniature bird nests, each containing several lentil-like structures called peridioles that hold the spores.

Rain splash dispersal

Its peridioles are dispersed by raindrops; when a drop hits the cup, the impact ejects the peridioles outward so they can stick to nearby surfaces and spread the fungus.

Wood and debris specialist

Nidula candida grows as a saprotroph, feeding on decaying wood, plant litter, and bark mulch, where it helps break down complex plant material in forest floors and garden beds.

FAQs about jellied bird's nest fungus

This fungus performs best outdoors or in very humid, sheltered outdoor-like setups, on decaying wood or very rich organic substrate. True jellied bird's nest fungus indoor care is difficult because most homes are too dry and lack suitable substrate.

Grow Healthy Plants with Botan Care

Keep your plants happy and healthy with plant identification, disease detection, and easy care guidance.
Botan plant care app — identify plants on mobile

Explore More Plants