

Chilean evening primrose Care (Oenothera stricta)

Also known as: fragrant evening-primrose, evening primrose, Sand Primrose, common evening primrose, Sweet Sundrop
Chilean evening primrose

About Chilean evening primrose

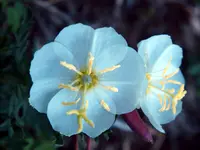
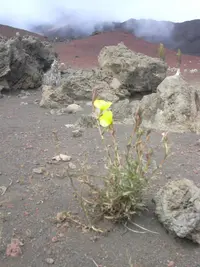
Chilean evening primrose (Oenothera stricta) is a short-lived perennial or biennial flowering plant known for its pale yellow, saucer-shaped blooms that often open toward evening. It usually forms a low, branching clump with narrow leaves and slender stems. This species is native to Chile and neighboring regions but is naturalized in parts of temperate coastal areas, often in sandy or disturbed soils. It is generally adaptable and can self-seed, which makes it easy to establish but sometimes a bit spreading. In gardens, it prefers sunny, open sites with well-drained, not overly rich soil and moderate moisture, which helps explain how to care for Chilean evening primrose in most home landscapes.

Main Plant Requirements

Care Difficulty

Easy Care

Light Preference

Full Sun

Water Requirements

Low Water

Temperature Preference

Warm Climate

Hardiness Zone

7–10

Soil Texture

Sandy, Loamy, Rocky

Soil pH

Slightly acidic (6.5–7.0), Neutral (7.0)

Soil Drainage

Well-drained

Fertilization

Minimal (feed rarely)

Get Personalized Care Plan

Scan your plant to receive care tips personalized for your specific plant

Available on iOS and Android

How to Care for the Chilean evening primrose

This sun-loving perennial thrives in open, exposed sites with strong light.

  • Provide 6–8 hours of direct sun daily; Chilean evening primrose performs best with full morning and early afternoon sun.
  • Plant in a spot that still gets at least 4–5 hours of sun in summer; in hotter regions, light afternoon shade helps prevent leaf scorch.
  • In dense shade, flowering drops and stems stretch; in winter, any available bright exposure supports compact growth and better spring blooming.

This species prefers dry to moderately dry conditions and is vulnerable to excess moisture.

  • Water only when the top 3–5 cm of soil are completely dry, then soak thoroughly and let excess drain away.
  • Ensure sharply drained, sandy or gravelly soil; persistent wetness, yellowing foliage, or a soft crown indicate overwatering and potential root rot in Oenothera stricta.
  • During cool or rainy seasons, watering is rarely needed; in hot, dry spells, watch for limp, dull foliage as a cue for a deep but infrequent watering.

This plant is adapted to warm, dry climates but tolerates a reasonable range of outdoor temperatures.

  • Best growth occurs around 65–80°F (18–27°C), supporting steady foliage development and flowering.
  • Established plants tolerate brief dips to about 20°F (-6°C); hard freezes below this can damage crowns, especially in poorly drained soil.
  • In hot periods above 90°F (32°C), flowering may slow; dry air is tolerated, but combine heat with well-drained soil to avoid stress and crown rot.

This species handles low humidity well and rarely needs special moisture in the air.

  • Target 30–50% humidity, similar to most indoor and outdoor household conditions.
  • Dry air is usually tolerated; leaves only stress in extreme heat combined with drought, showing edge browning and crisping.
  • If air is very dry and hot, reduce stress by watering soil appropriately and providing light airflow rather than misting.

This species prefers lean, well-drained, sandy soil that stays aerated and never waterlogged.

  • Use a gritty mix such as 50–60% sand or fine grit, 20–30% loam, and 10–20% compost for Oenothera stricta.
  • Ensure fast drainage by adding coarse sand or perlite and avoiding heavy clay or peat-heavy mixes that hold water.
  • Aim for slightly acidic to neutral pH, around 6.0–7.0, which supports nutrient availability without excess lime stress.
  • Avoid rich, dense, or continuously moist substrates, which encourage weak, floppy growth and root rot.

This species can grow in containers if the pot and substrate are chosen to keep roots dry and stable.

  • Choose a wide, relatively shallow pot to accommodate its spreading root system and reduce tipping in windy sites.
  • Use a mineral-heavy, fast-draining mix in a pot with large drainage holes so water exits within seconds after watering.
  • In hot, exposed locations, prefer terracotta over plastic so the root zone dries faster between waterings, preventing rot.

Oenothera stricta is adapted to lean soils and needs only light feeding in most garden settings.

  • Use a balanced, low-dose granular or liquid fertilizer (around 10-10-10 NPK) for plants in poor or sandy soils.
  • Feed lightly once in early spring and once in mid-summer during active growth to support flowering.
  • Dilute liquid fertilizer to 1/2 strength to avoid excessive leafy growth and reduced blooms.
  • Skip feeding in fall and winter when growth slows, especially in climates with cool or wet seasons.

Oenothera stricta benefits from modest pruning to maintain a tidy shape and support continued flowering.

  • Deadhead spent flower spikes through summer using clean scissors or hand pruners to encourage more blooms.
  • Remove any dead, damaged, or diseased stems as soon as noticed to limit rot and improve airflow.
  • In late fall or very early spring, cut back old, straggly growth to a low mound to renew the plant.
  • Avoid cutting into healthy crowns too hard; leave some green growth to support quick regrowth.

This species is usually grown in the ground, so focus on careful transplanting rather than frequent repotting.

  • Transplant in early spring or early fall, when temperatures are mild and soil is moist but not waterlogged.
  • Choose a sunny, well-drained site and amend heavy clay with grit or coarse compost to reduce root stress.
  • Move plants only when clumps become crowded or flowering declines, disturbing roots as little as possible.
  • Water thoroughly after transplanting, then keep soil lightly moist for 1–2 weeks until new growth indicates recovery.

Oenothera stricta is most often propagated from seeds, with division used for established clumps.

  • Sow fresh seeds in late fall outdoors or in early spring; light helps germination, so barely cover them.
  • Provide well-drained, sandy soil and keep it evenly moist at 60–70°F until seedlings appear.
  • Thin or prick out seedlings once they have 2–3 true leaves, spacing to avoid overcrowding.
  • Divide mature clumps in early spring, replanting divisions promptly at the same depth and watering well.

This perennial is generally cold hardy in temperate climates and needs minimal winter care once established.

  • In colder areas, apply a 5–7 cm layer of mulch around the crown after the ground cools, keeping it off stems.
  • Allow top growth to die back naturally, then cut it close to ground level in late winter or early spring.
  • For containers in regions with hard freezes, move pots to a sheltered, unheated garage or porch to reduce root damage.

Care Tips

Support Tall Stems

In exposed or windy sites, place low, unobtrusive wire hoops or short stakes early in the season so the plant’s tall, upright stems stay supported and do not lodge or snap after heavy rain.

Encourage Successive Blooms

Deadhead spent flowers every few days before they set seed to direct energy into new buds, then allow some flowers to mature later in the season if you want controlled self-seeding for next year’s plants.

Manage Self-Seeding

If the plant spreads more than desired, shear back stems after the main flush of flowering and remove seed pods before they ripen, focusing especially on the outer edges of the planting where seedlings tend to colonize new ground.

Improve Drought Resilience

Top-dress the root zone with 1–2 cm of grit or coarse sand mixed into the soil surface to encourage deeper rooting and faster drainage, which helps when growing Chilean evening primrose in areas with hot, dry summers.

Monitor Night Pollinators

If flowering or seed set is poor, visit the plants at dusk to check for moth activity and consider reducing nearby outdoor lighting, which can distract night pollinators that normally service this evening-blooming species.

Common Pests and Diseases

Aphids

This pest often colonizes young stems, buds, and the undersides of leaves, sucking sap and causing distortion and sticky honeydew deposits. Symptoms include curled foliage, stunted new growth, and increased risk of sooty mold on the honeydew.

Solution

Spray plants with a firm stream of water to dislodge colonies, then use insecticidal soap or a light horticultural oil, ensuring thorough coverage of shoot tips and leaf undersides. Encourage natural predators such as lady beetles and avoid high nitrogen fertilization that promotes very soft, aphid-prone growth.

Spider mites

These insects are tiny arachnids that feed on leaf cells, especially in hot, dry conditions, leading to pale stippling, dull foliage, and fine webbing between leaves and stems. Severe infestations can cause leaf drop and general decline in flowering performance.

Solution

Increase humidity around plants, then wash foliage with water to remove mites and webbing, repeating several times over 7–10 days. For persistent problems, apply insecticidal soap or a miticide labeled for ornamental plants, focusing on the undersides of leaves and inner stems.

Leaf spot

This disease causes small brown to dark purple spots on leaves that may merge into larger blotches, leading to premature yellowing and leaf drop in humid or overcrowded plantings. Symptoms include a patchy, thinning canopy and reduced vigor in affected clumps.

Solution

Remove and discard heavily spotted leaves to reduce inoculum, and improve airflow by thinning crowded stems and avoiding overhead watering late in the day. If the problem recurs each season, apply a preventive fungicide labeled for ornamental leaf spots at the first sign of spotting and maintain a clean mulch layer to limit splash spread.

Rust

This disease produces small yellow to orange spots on upper leaf surfaces and powdery rust-colored pustules on the undersides, particularly during mild, moist weather. Symptoms include weakened foliage, reduced flowering, and early leaf drop.

Solution

Promptly remove and destroy infected leaves and any fallen debris, and water at soil level rather than over the foliage to keep leaves dry. In sites with a history of rust, use wider spacing, avoid excess nitrogen, and consider a protective fungicide labeled for rust if symptoms appear early in the growing season.

Interesting Facts

Dunes and sandy specialists

This species is naturally associated with coastal dunes and dry sandy soils in parts of South America and has become a characteristic colonizer of disturbed sandy sites in some other regions where it has naturalized.

Evening-opening flowers

Like many evening primroses, its pale yellow flowers typically open toward evening and are adapted for pollination by nocturnal insects such as moths that are active at dusk and at night.

Prolific seed producer

The plant forms narrow seed capsules that mature large numbers of tiny seeds, which helps it spread effectively along roadsides, railways, and other disturbed habitats where soil is bare or frequently moved.

Botan icon

Did you know?

In several regions outside its native range, this species has been recorded as a casual or naturalized plant in coastal areas and transport corridors, where it can act as an early successional species that stabilizes loose sandy substrates before longer-lived vegetation establishes.

FAQs about Chilean evening primrose

This species can self-seed and form spreading clumps, especially in sandy, disturbed soils. In suitable climates it may naturalize, but it is usually manageable with deadheading spent flowers and removing unwanted seedlings before they establish.

Grow Healthy Plants with Botan Care

Keep your plants happy and healthy with plant identification, disease detection, and easy care guidance.

Botan plant care app — identify plants on mobile

Explore More Plants